
Quickstart guide
From first launch to first chapter
Write your manuscript, build your world and gather your inspiration in one desktop app. Screenshots come from a demo project, The Ember Crown.
What is Worldscape?
The three apps and how they fit together.
Worldscape keeps everything about a book in one place. Each project links a manuscript to its world, and you work on both side by side.
| App | What it is for |
|---|---|
| WorldSkript | Writing the manuscript: chapters, page layout, notes, dictionary, citations, images and history. |
| Worldbook | Your story bible: characters, places and lore, relationships, storyboard, timeline and calendars. |
| MoodBoard | Free-form boards of pictures, notes and colour swatches linked to your characters and places. |
You can open any app on its own (full view) or two together (split view).
Your files stay yours. Worldscape works fully offline. Every project is saved in a folder you choose on your own computer.
Install and quick start
Install, first-run warnings, updates and your first five minutes.
Install and first launch
- Download the installer for your system from the releases page: Windows (
.exeor.msi), macOS (.dmg) or Linux (.deb,.rpmor.AppImage). Worldscape is distributed only as installation files. - Install and open Worldscape. The app works fully offline, and nothing is pre-filled: no sample projects and no dictionaries.
- The app checks for updates in the background. Nothing installs by itself: when a new version is ready, select Restart and update. Your work is saved first.
If your system shows a warning
Worldscape is not code-signed yet, so Windows and macOS may warn you the first time you open it.
- Windows. If a blue “Windows protected your PC” window appears, choose More info, then Run anyway.
- macOS. Open the
.dmgand drag Worldscape into Applications. Then runxattr -cr /Applications/Worldscape.apponce in Terminal. If macOS still blocks it, choose Open Anyway in System Settings → Privacy & Security. - Linux. Make the AppImage executable (right-click → Properties, or
chmod +x) and open it. The.deband.rpmfiles install with your package manager.
Updates
Worldscape checks shortly after it starts and then every six hours. When a new version is ready, a small bar appears and nothing installs until you select Restart and update. Worldscape saves your chapters and open panels first, and cancels the update if anything cannot be saved. Updates are signed, and the app only accepts packages signed with Worldscape’s own key. You can also check at any time in Settings.
Your first five minutes
- Create a project. On the start page, select New project, name it and select Create & open.
- Set up your book. In WorldSkript, select Page layout to set the title, author, book size, typeface and cover.
- Write. Add chapters with Chapter and start writing. Chapter titles are added to the contents for you.
- Build your world. Switch to Worldbook to add characters and places.
- Gather inspiration. Open MoodBoard to collect images, notes and colours for a character or place.
Library and projects
Collections, new projects and settings.
The start page is your Library. Use Shelf (book spines) or Grid (covers) to browse.
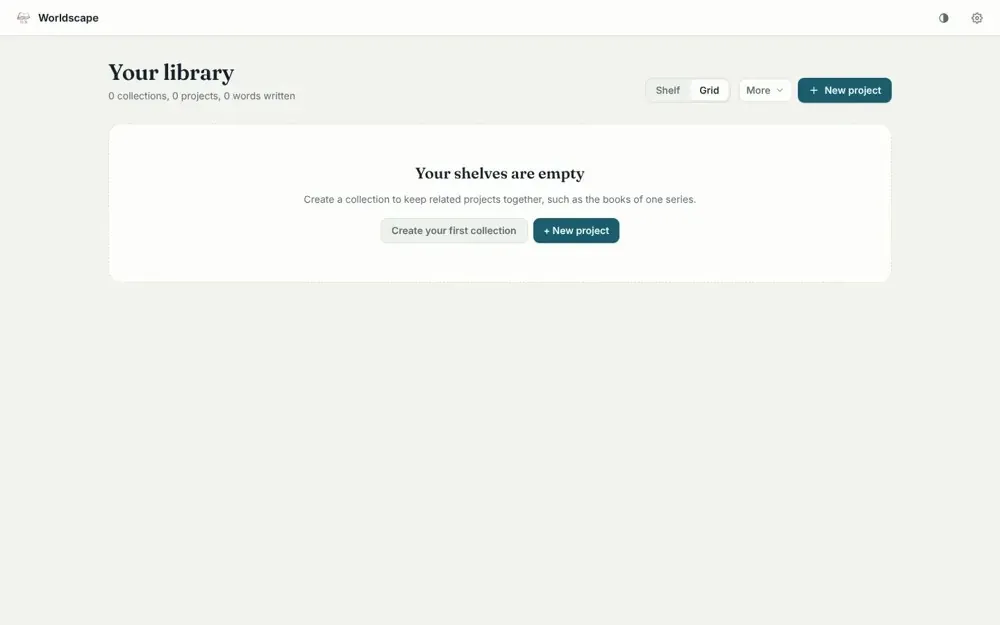
Create your first project
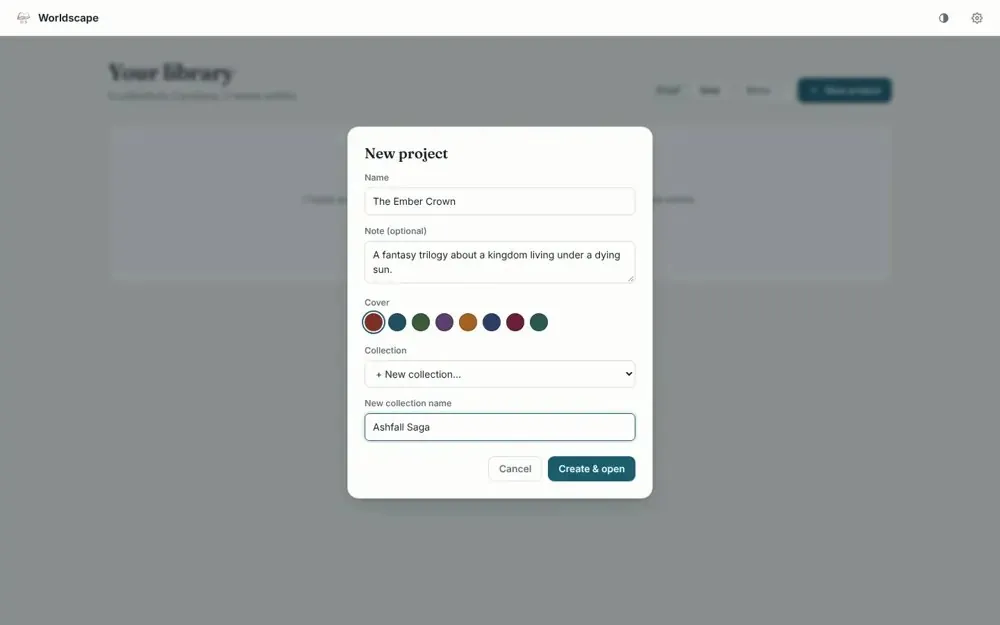
- Select New project.
- Give it a name, an optional note and a cover colour.
- Choose a collection (for example one book series), or create a new one by typing its name.
- Pick where the project folder should be saved, then select Create & open.
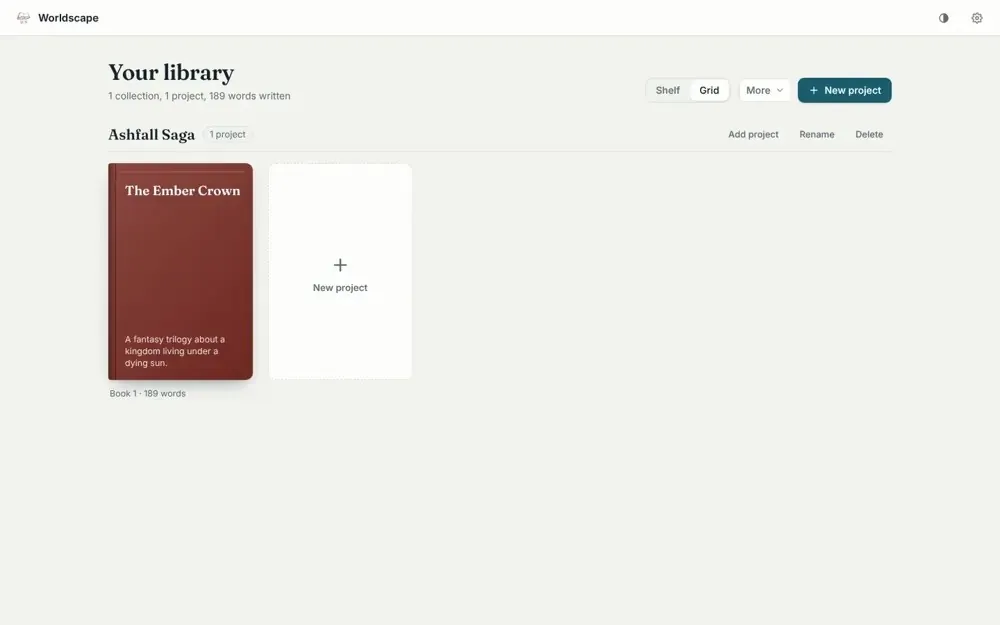
Your project now appears on the shelf, and you can drag books between collections to reorder them.
Settings and shortcuts
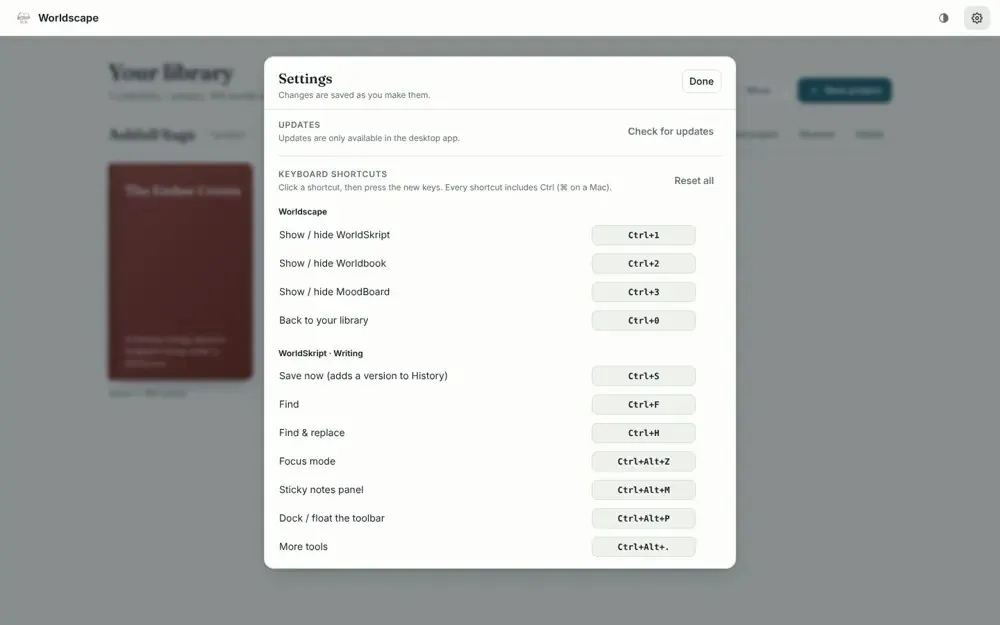
Open Settings (gear icon, top right) to check for updates and to change any keyboard shortcut. If two actions share a key, they are outlined in red until you fix it.
Appearance. The half-circle button in the top bar switches the whole app between Light, Dark and High contrast, or follows your system setting.
The workspace
Write, Plan and MoodBoard, full view and split view.
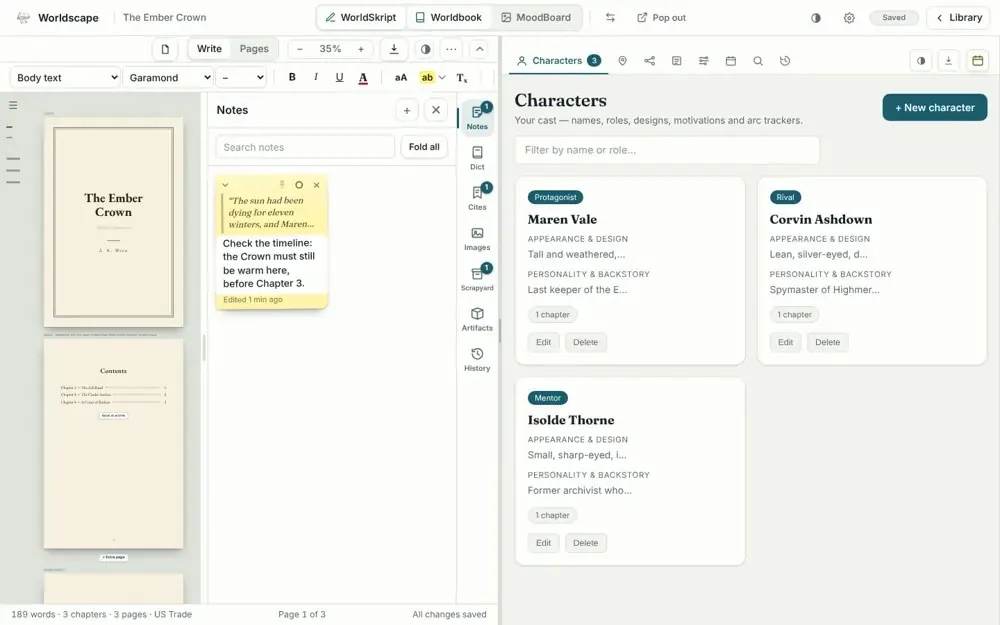
Open a project (double-click it) and you land in Write + Plan split view.
| Action | How |
|---|---|
| Show an app | Select WorldSkript, Worldbook or MoodBoard in the top bar. Select two to see them side by side. |
| Show one app only | Double-click its button. |
| Switch directly | Ctrl/⌘ + 1 Write, Ctrl/⌘ + 2 Plan, Ctrl/⌘ + 3 MoodBoard. |
| Swap left and right | The ⇄ button. |
| Second monitor | Pop out moves a pane into its own window. |
| Back to the library | The Library button, or Ctrl/⌘ + 0. |
The Saved indicator in the top bar tells you that all apps have saved.
WorldSkript
Page layout, chapters, notes, flags and events, citations, history and more.
Page layout
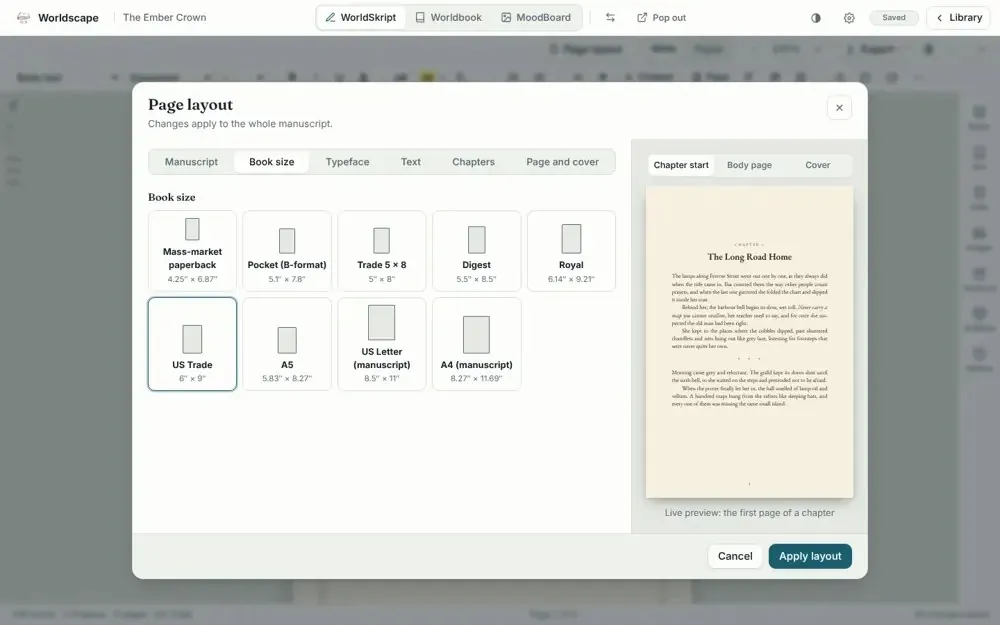
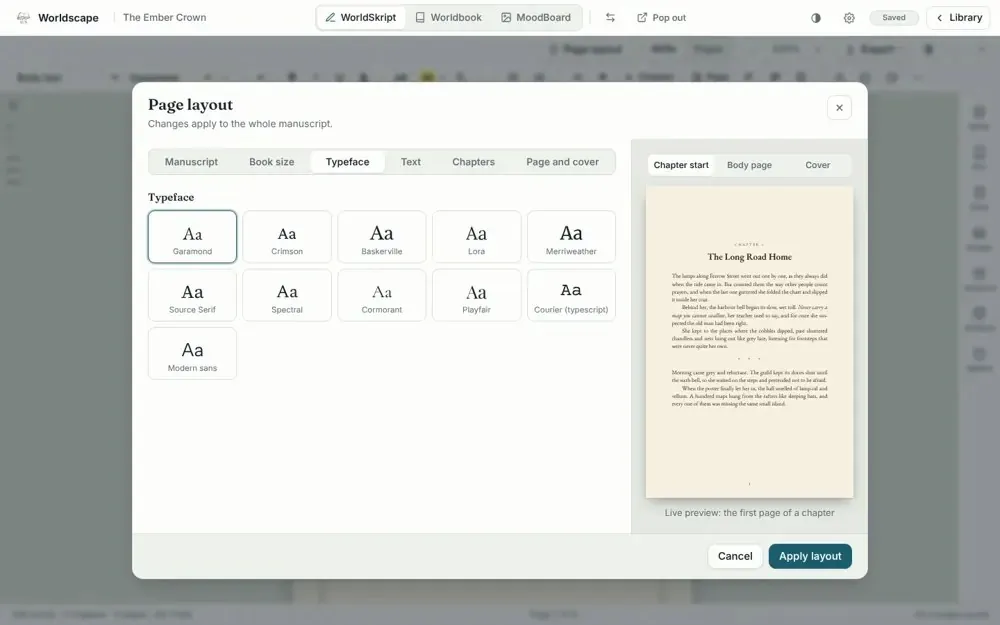
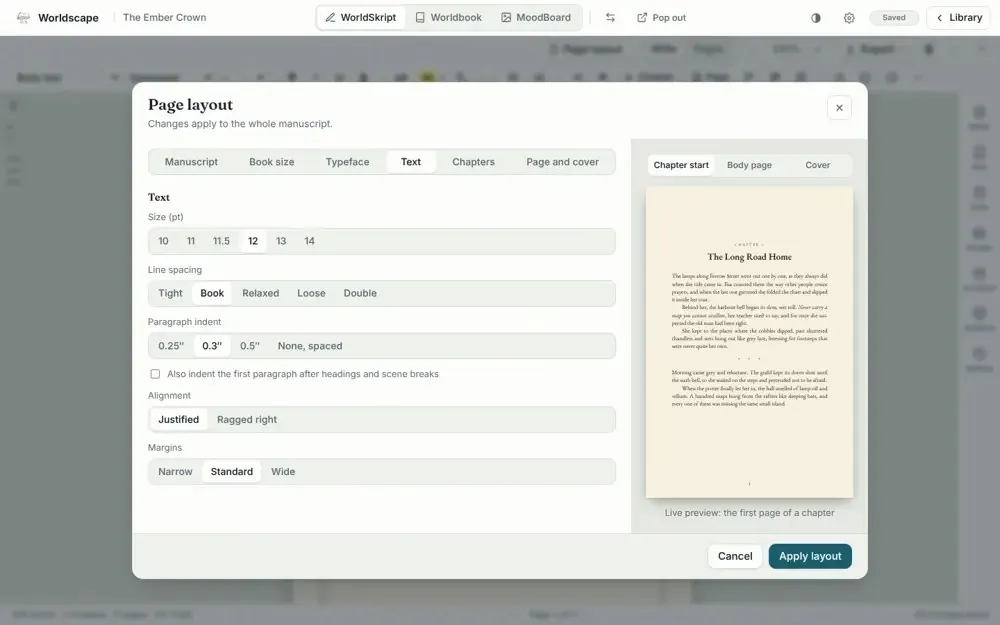
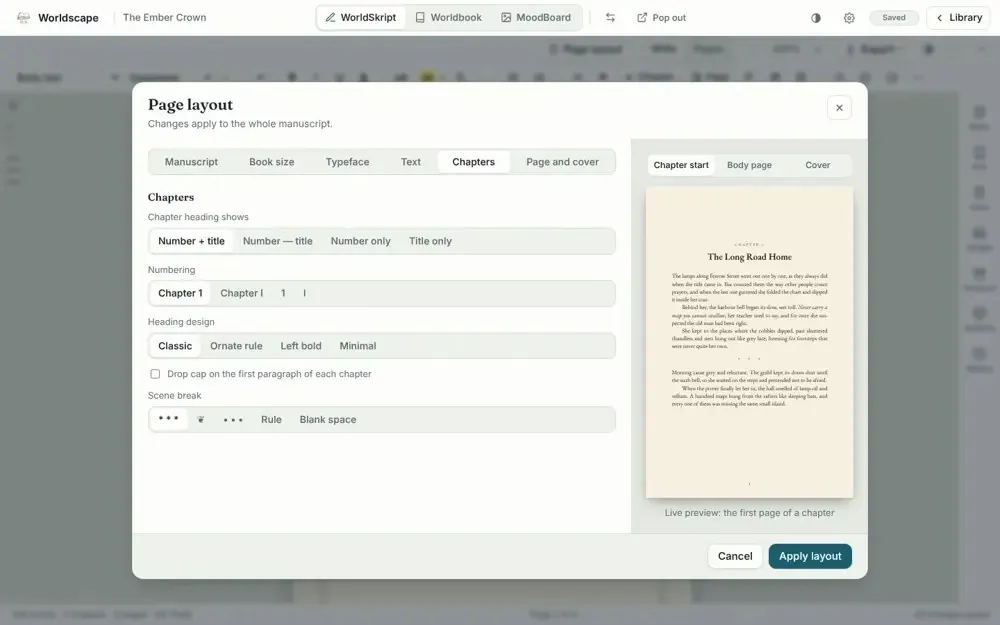
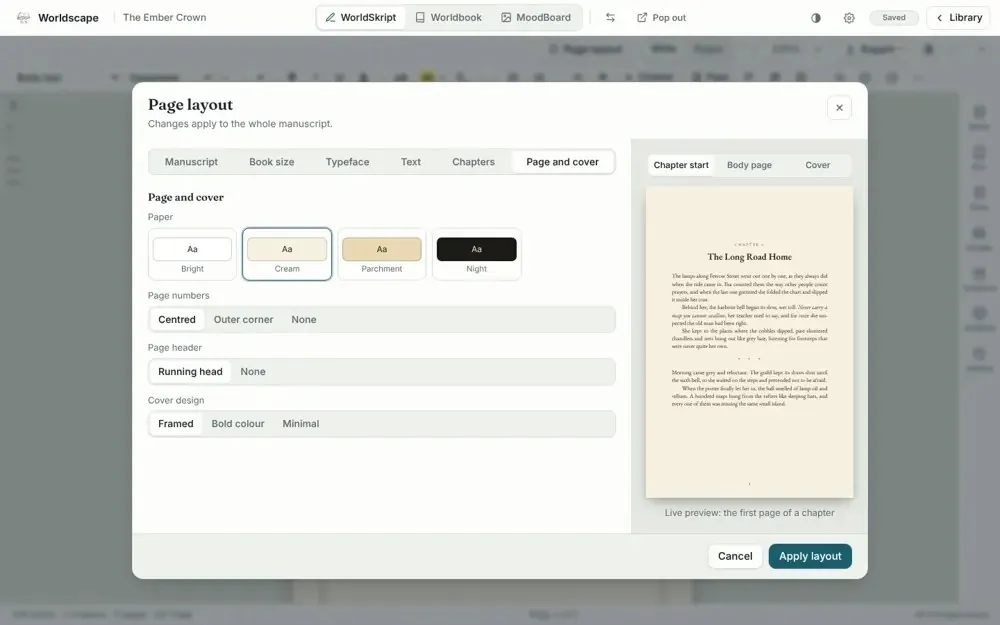
Select Page layout to set up the whole book. A live preview shows your changes.
- Manuscript: rename the manuscript, add the author name and choose the cover colour.
- Book size: nine formats, from mass-market paperback to A4.
- Typeface: eleven book fonts.
- Text: size, line spacing, paragraph indent, alignment and margins.
- Chapters: heading style, numbering and chapter openers.
- Page and cover: paper tone, page numbers, headers and cover design.
Writing, chapters and notes
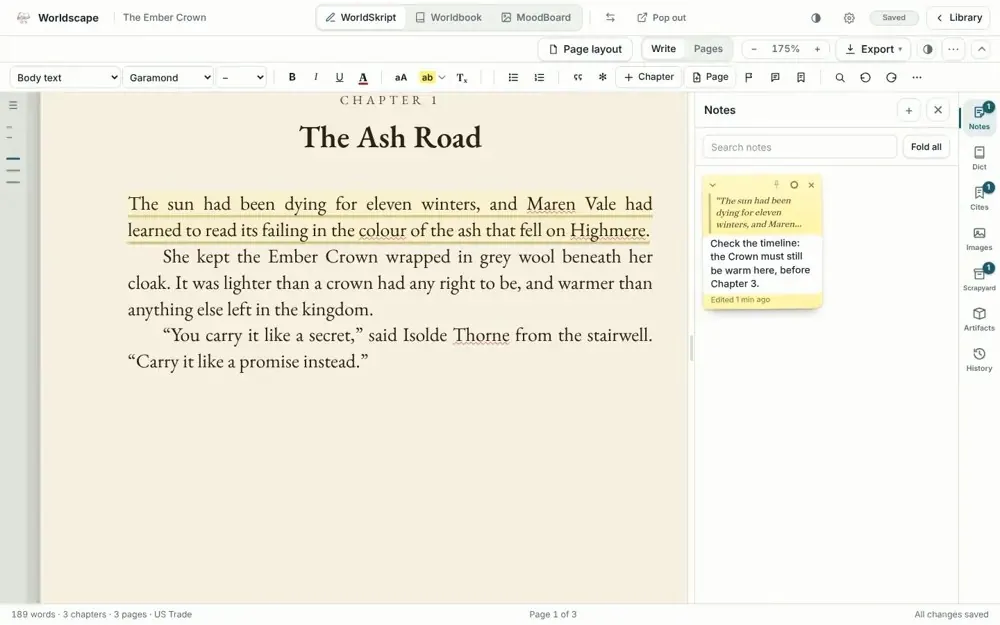
Type directly on the page. Add a chapter with the Chapter button, or press Enter three times. Chapters start on a new page and appear in the Index on their own. Select text to:
- add a note, shown as a yellow sticky note in the Notes panel (Ctrl/⌘ + Alt + N);
- flag a major event at the cursor (Ctrl/⌘ + Alt + E), shown as a dot in the margin;
- right-click to add a note, a flag or an artifact (a character, place or lore item).
Navigate with the outline
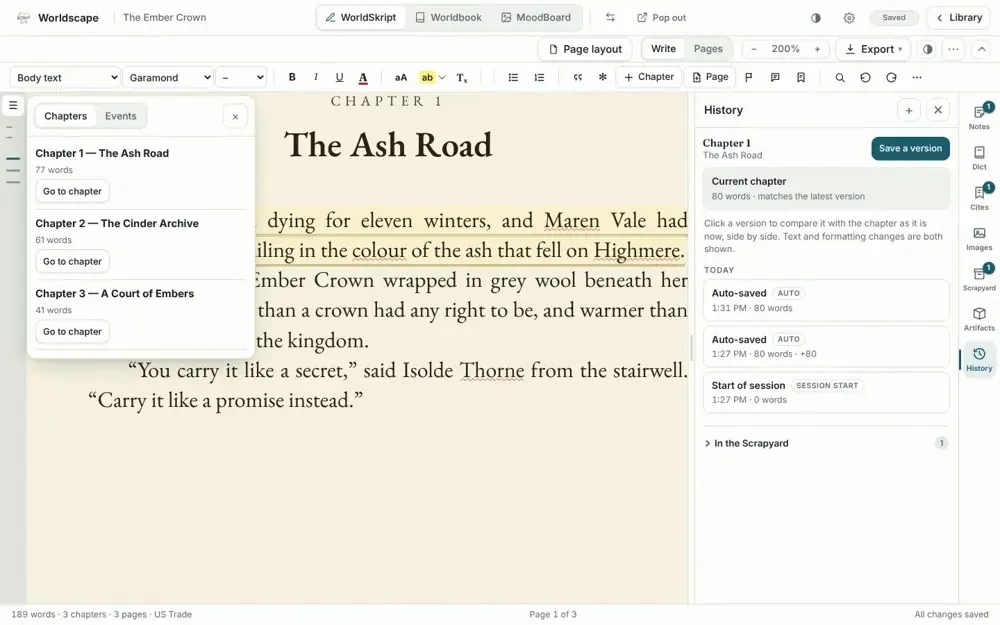
The ☰ button opens Chapters and Events. Jump to any chapter, set one aside, or send events to Worldbook.
Events: send and add in both directions
An event is a key moment in a chapter. A flag in WorldSkript and an event in the Worldbook storyboard are two views of the same moment, and you can start from either side. Click inside a chapter first: the Events tab only lists the chapter your cursor is in.
WorldSkript → Worldbook (send a flag)
- Click in the chapter where it happens, then select the flag button in the toolbar (or press Ctrl/⌘ + Alt + E).
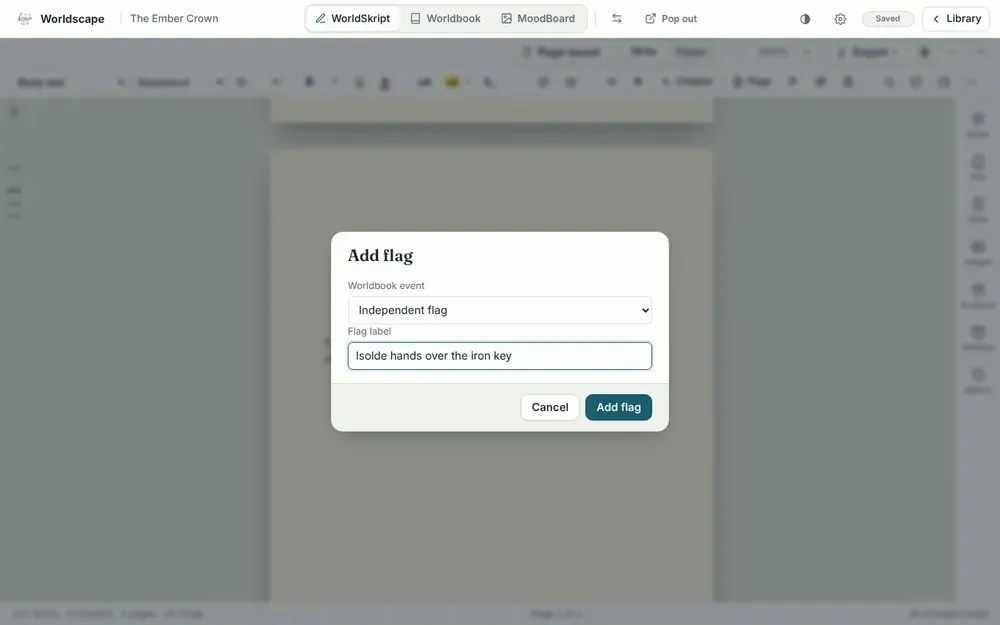
- Leave Worldbook event on Independent flag, type a label and select Add flag. A dot appears in the margin beside that line.
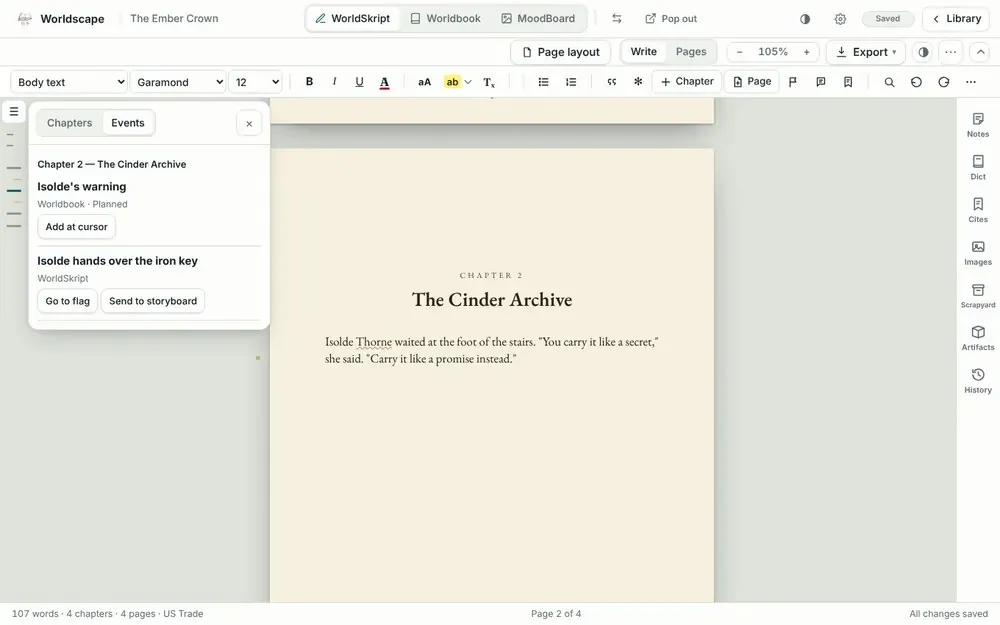
- Open ☰ → Events. Your flag is listed as WorldSkript. Select Send to storyboard.
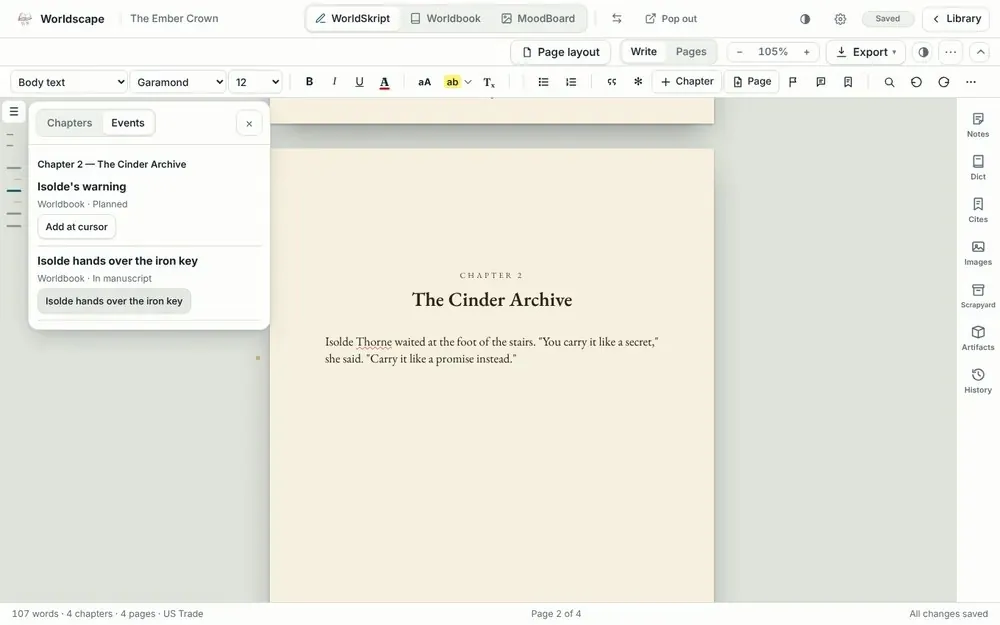
- The flag is now linked. The list says Worldbook · In manuscript, and the event appears under that chapter in the Worldbook storyboard.
Worldbook → WorldSkript (add at cursor)
- In Worldbook, open Storyboard and select + event on a chapter (see section 6).
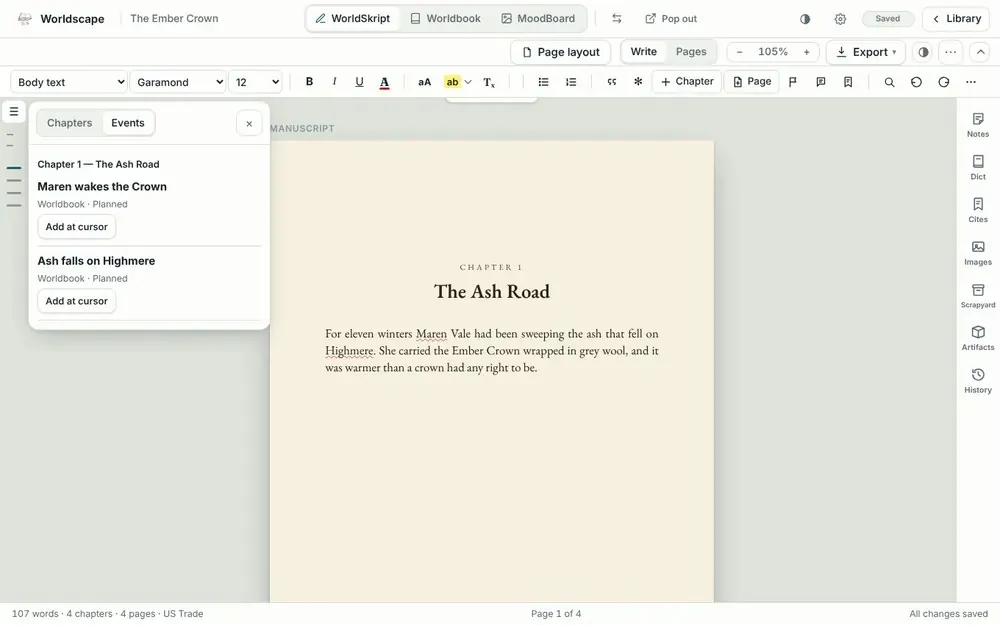
- In WorldSkript, put the cursor in that chapter and open ☰ → Events. Events planned in Worldbook but not yet in the text are marked Worldbook · Planned.
- Select Add at cursor (the button reads Add at chapter start when your cursor is in another chapter). The flag is placed in the text and the event now reads In manuscript.
You can also link a flag to a Worldbook event while you create it: in the Add flag dialog, pick the event from the Worldbook event list.
Working with a flag
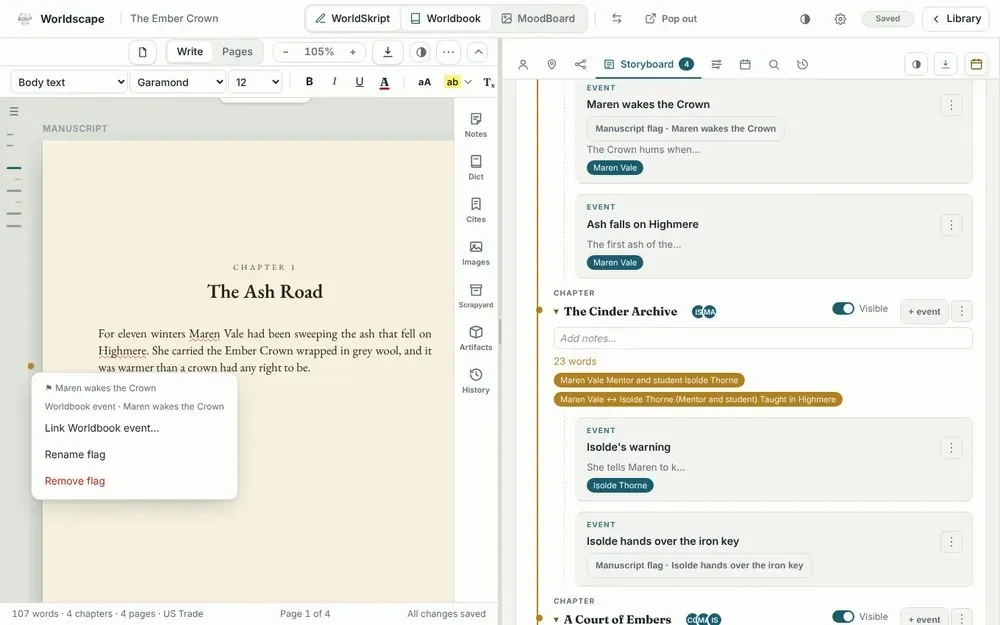
- Select its dot in the margin to Link Worldbook event…, Rename flag or Remove flag.
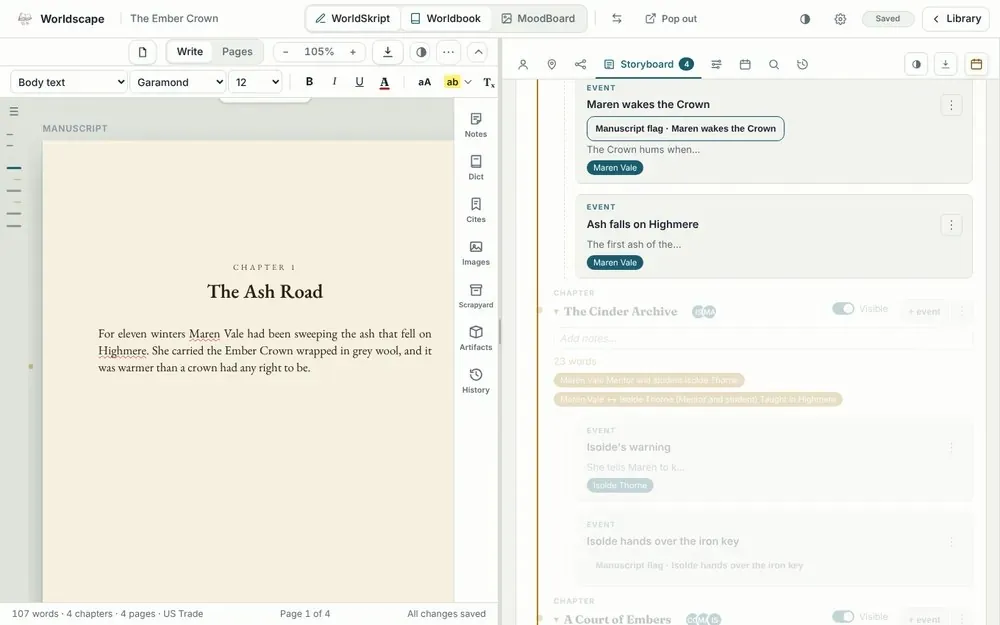
- In Worldbook, a linked event carries a Manuscript flag button. Select it and WorldSkript opens at that exact spot, next to Worldbook.
Guides in the left margin
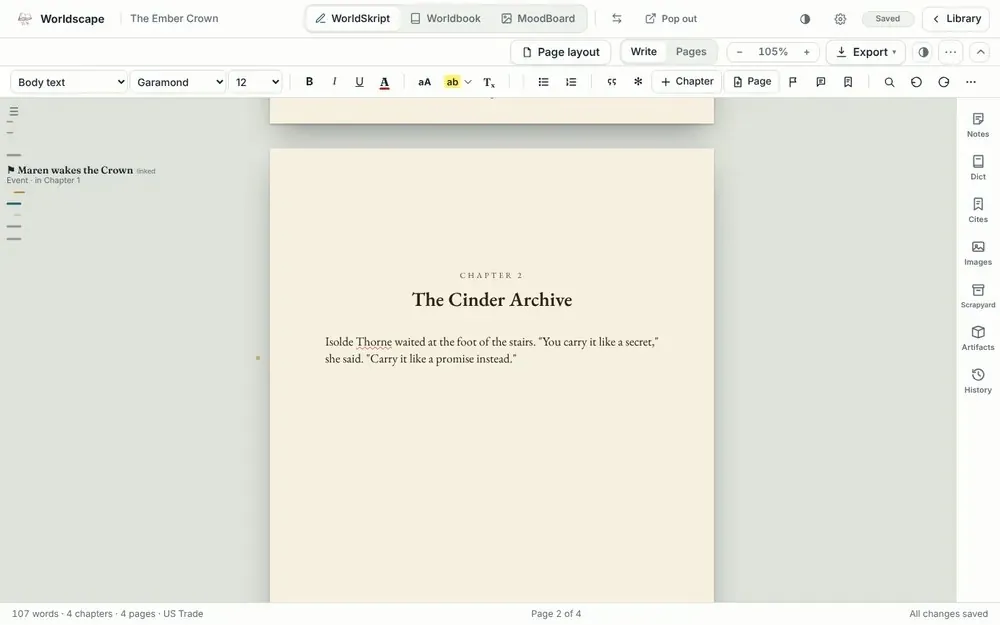
The thin rail on the far left lists the cover, the index, every chapter and every flag as small dashes, so you can move through a long manuscript quickly. Long dashes are chapters and short gold dashes are event flags. Hover over one to see its name and select it to jump there. The dash for the part you are reading is highlighted.
Artifacts
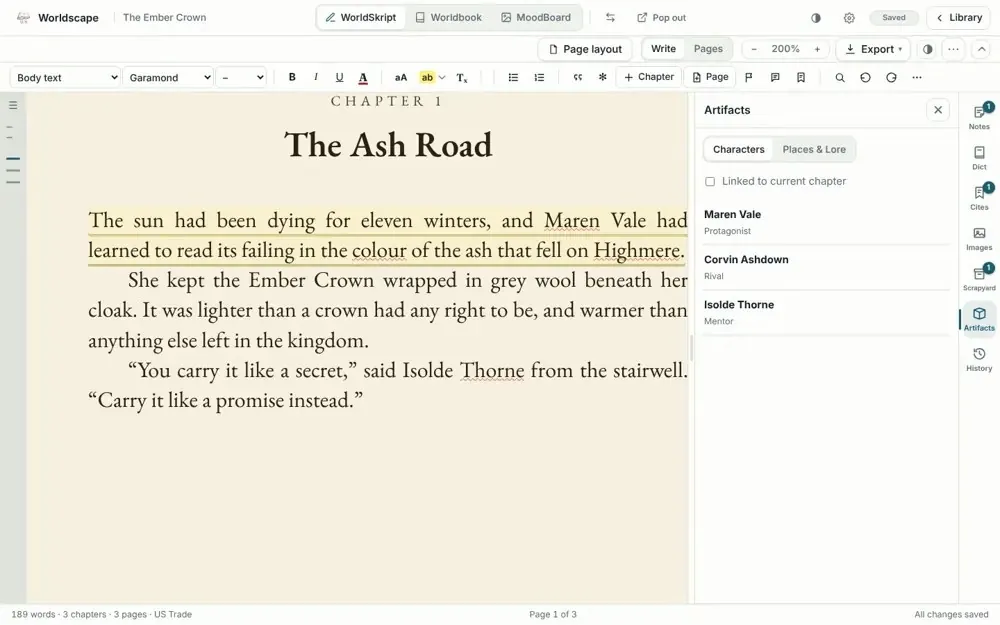
The Artifacts panel lists the characters, places and lore involved in the chapter you are reading, taken from Worldbook.
Dictionary
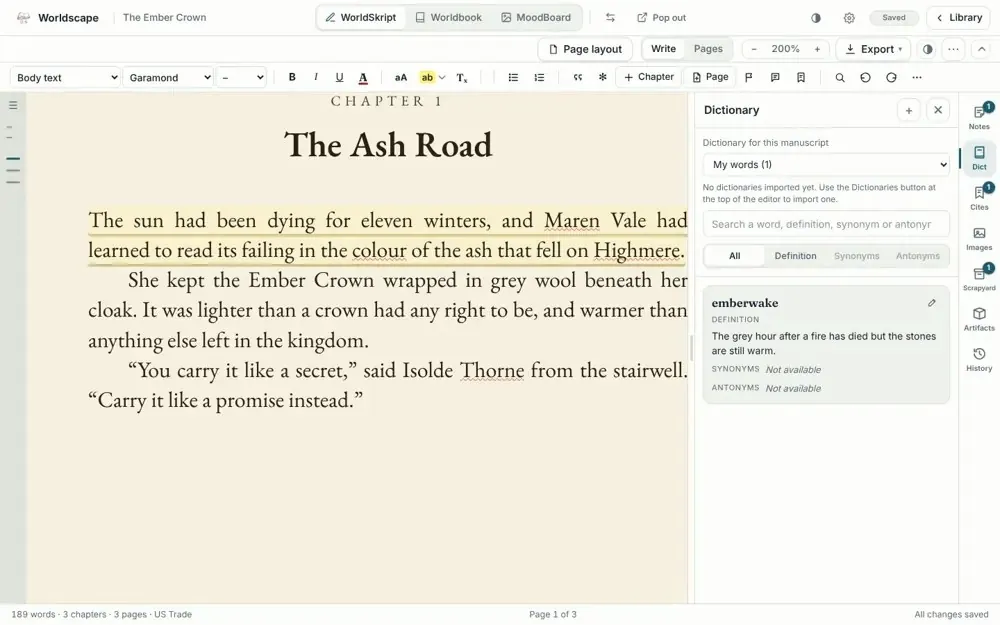
Add your own words with a definition, or import a dictionary. With spell check on, right-click a red word to correct it or Add to dictionary.
Citations
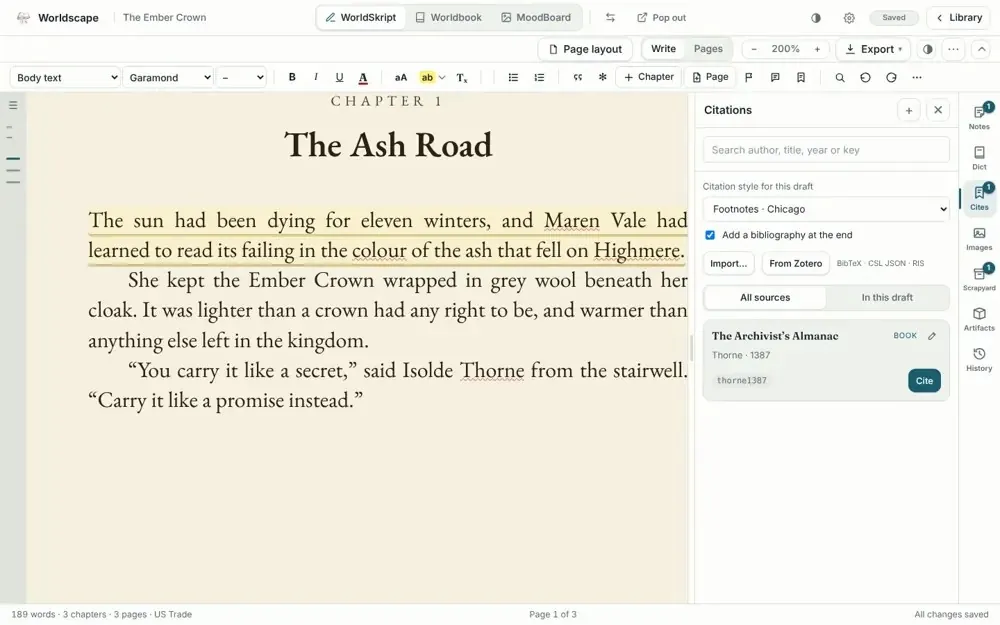
Add sources by hand or import them from Zotero, then cite them in the text. The bibliography is added at the end of the book and to the index.
Scrapyard
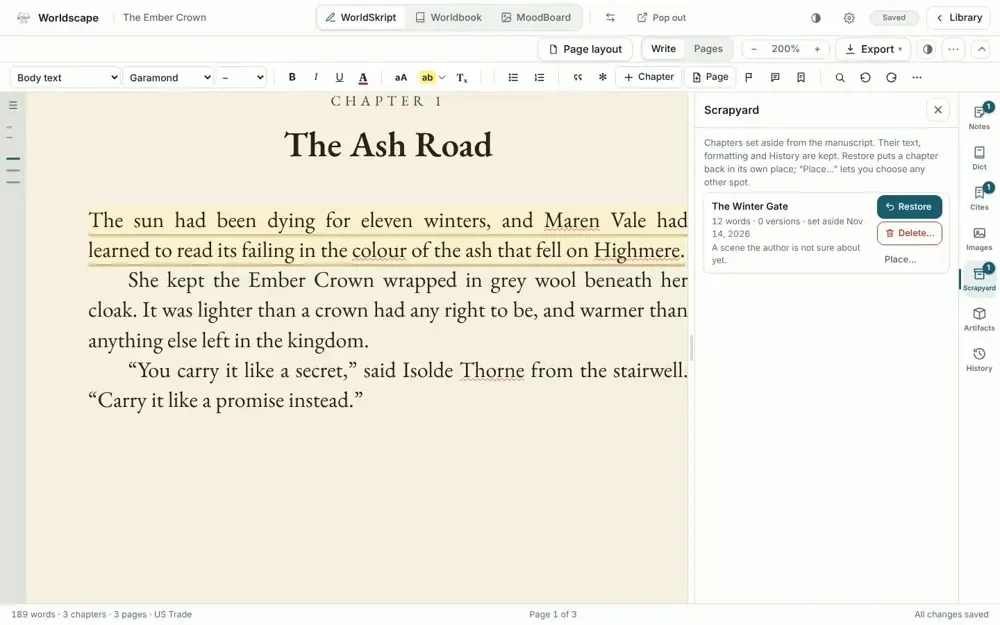
Not sure about a chapter? Send it to the Scrapyard. Restore puts it back in its original place, and Place… lets you choose another position. Its history is kept.
History
Every chapter keeps saved versions. Save one yourself with Save a version (or Ctrl/⌘ + S); WorldSkript also saves them automatically. Select a version to compare it to the current text, then restore it if you wish.
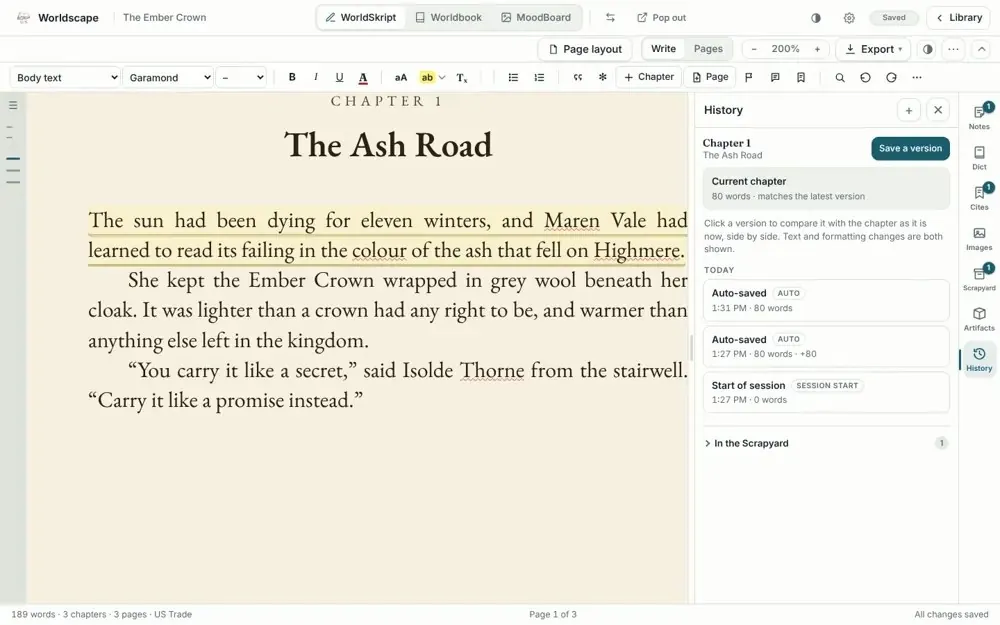
Focus mode, spell check and more
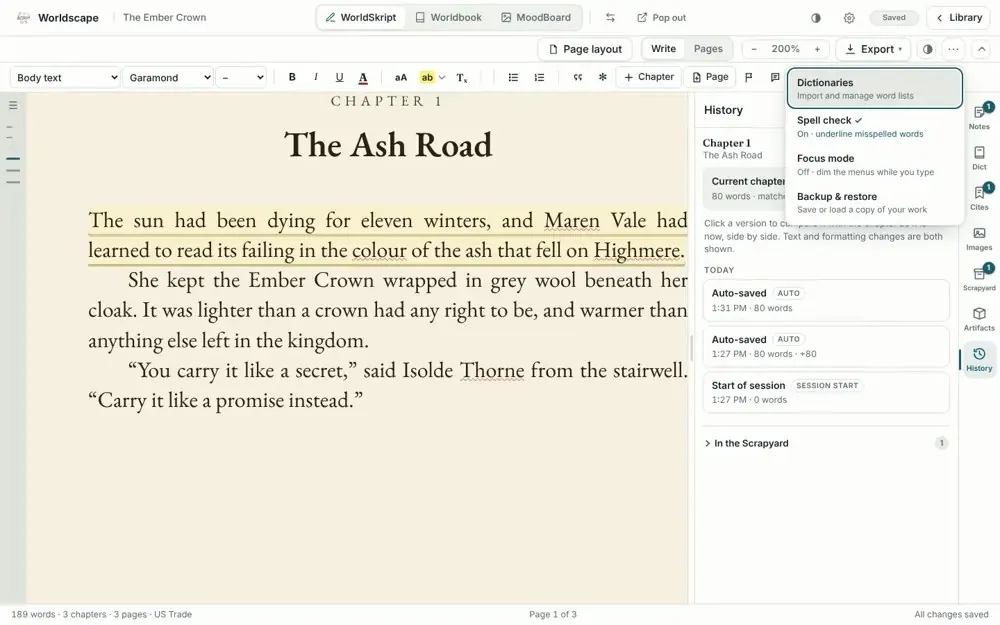
The … menu holds Dictionaries, Spell check (on or off), Focus mode (dims the menus while you type) and Backup. Use Export to create a Word or EPUB file.
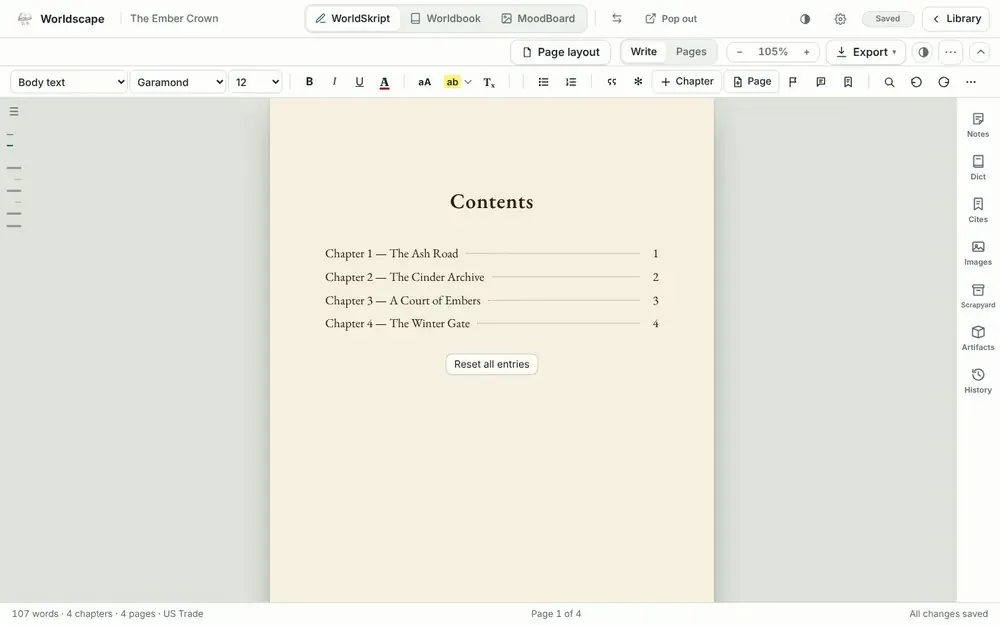
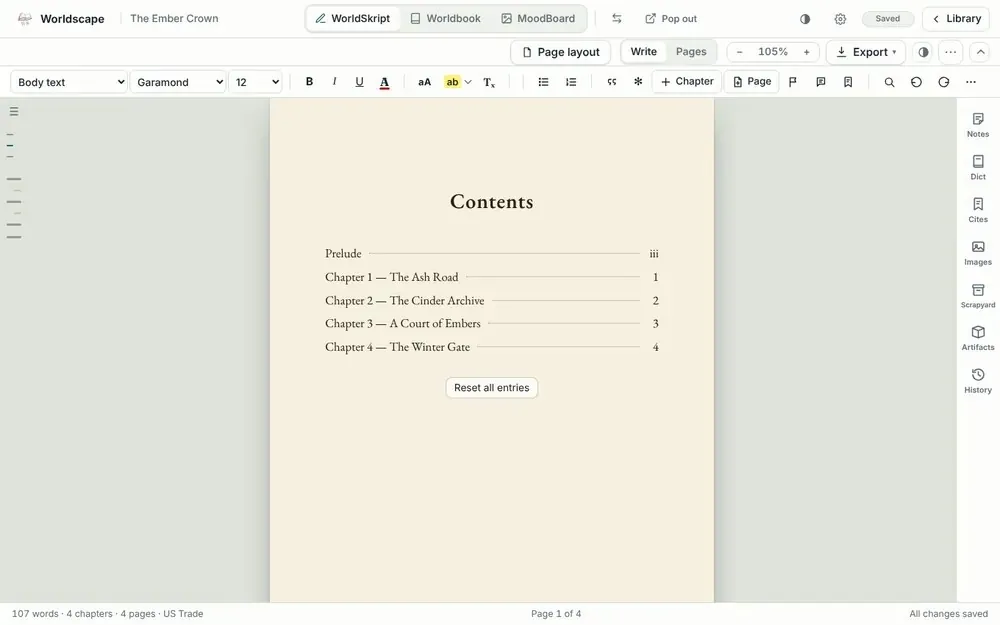
Extra pages and the index
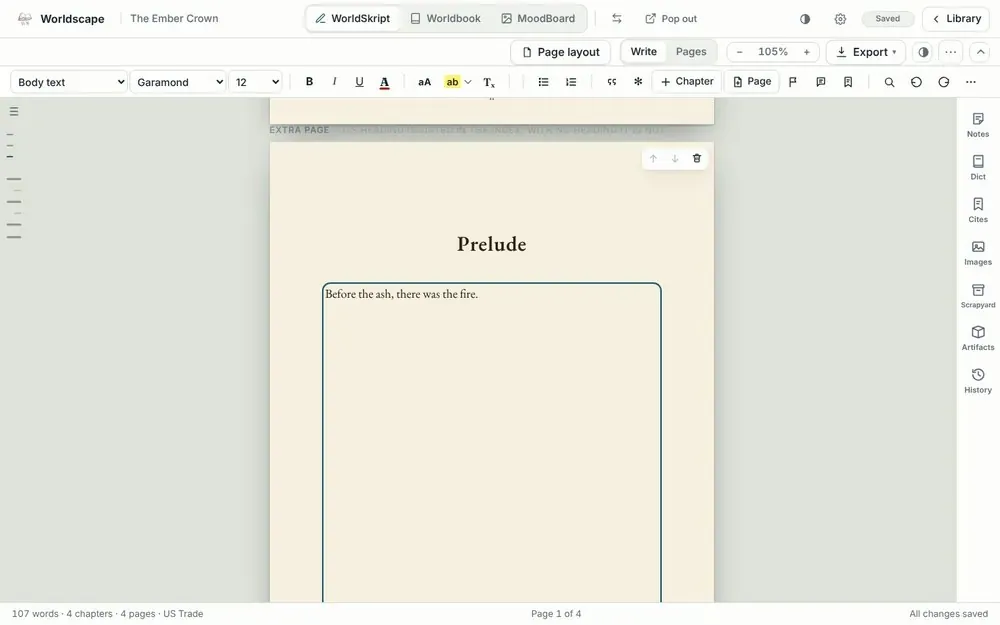
Use + Extra page (the small button under the index, and between extra pages) to add a prelude, a dedication, notes or a map page before the first chapter.
- Select + Extra page. The cursor jumps to the page heading.
- Type a heading (for example Prelude), then write the page text, or place an image from the Images panel.
- The heading is added to the Contents by itself, with its own page number. A page with no heading stays out of the index.
- Use the arrows on the page to move it up or down, and the bin to delete it. Chapters added later also appear in the index by themselves.
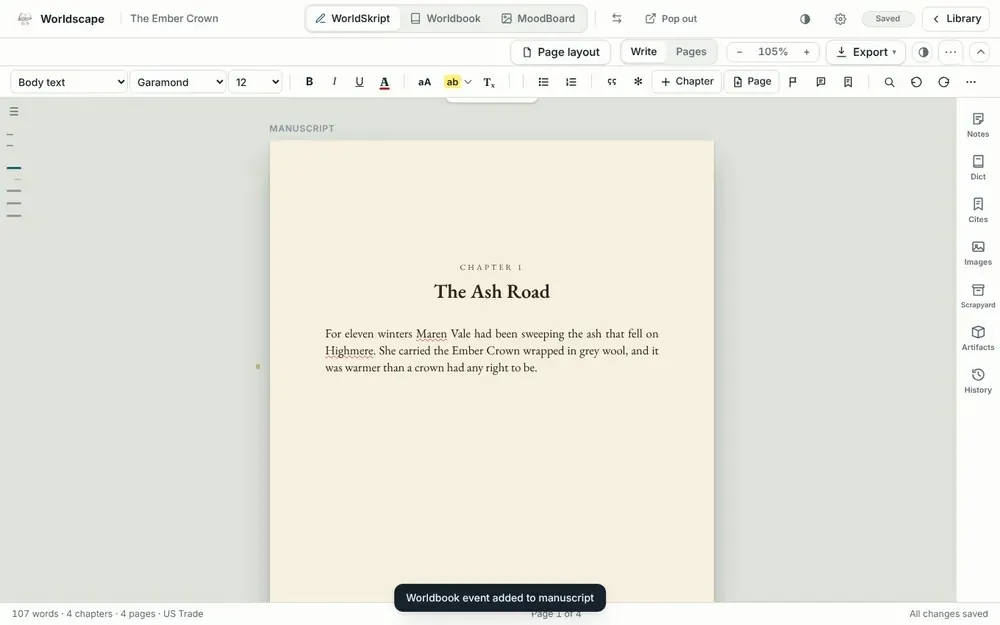
The first screenshot shows the index before an extra page. After adding the extra page Prelude, it appears in the index, and the page itself sits in front of Chapter 1.
Images. Place pictures in your manuscript or on extra pages from the Images panel. Placed images can be resized, aligned and captioned.
Worldbook
Characters, places, relationships, storyboard, timeline and calendars.
Worldbook has eight sections in its left menu.
Characters
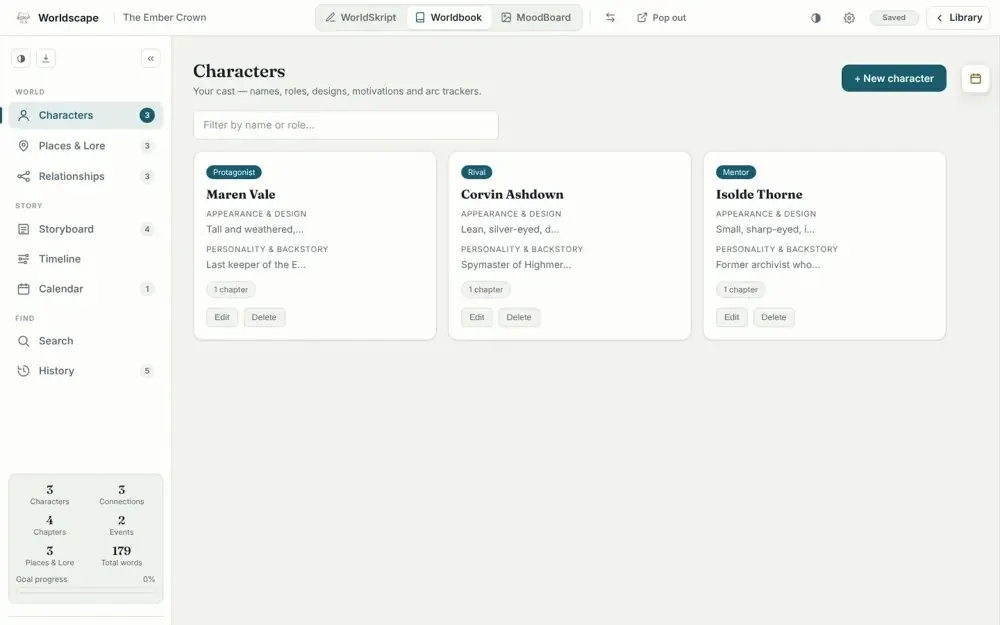
Select + New character and fill in name, role, appearance and backstory. You can also record how a character changes from chapter to chapter.
Places & Lore
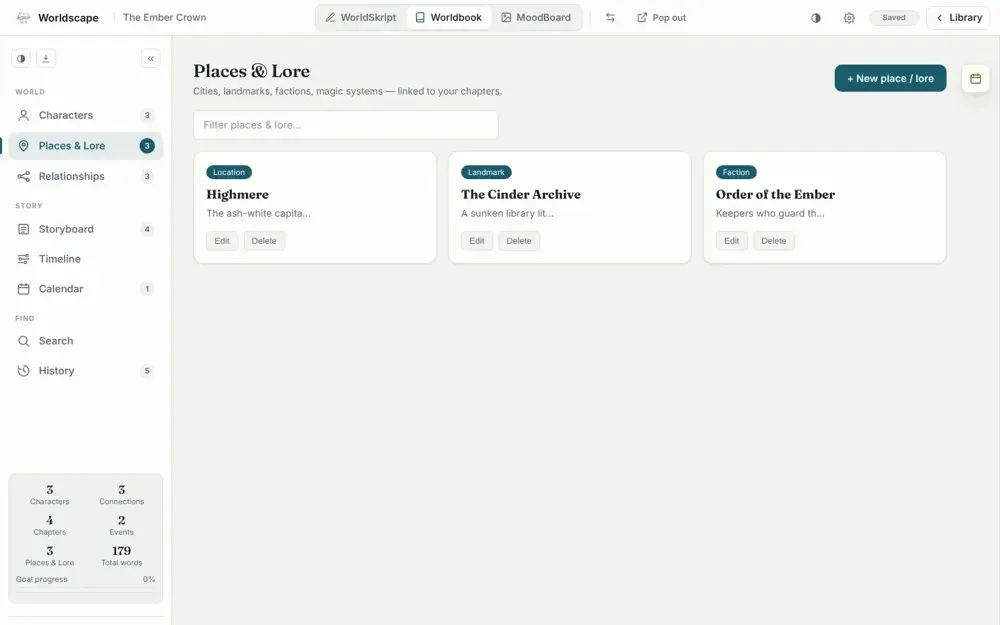
Cities, landmarks, factions, magic systems and items. Link each entry to a chapter and, if you like, to a calendar.
Relationships
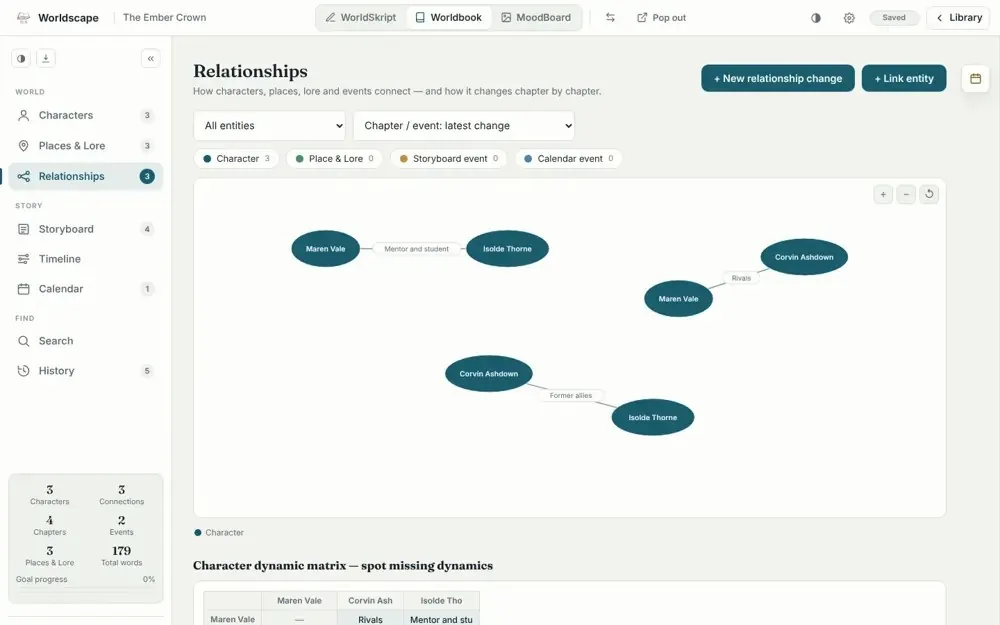
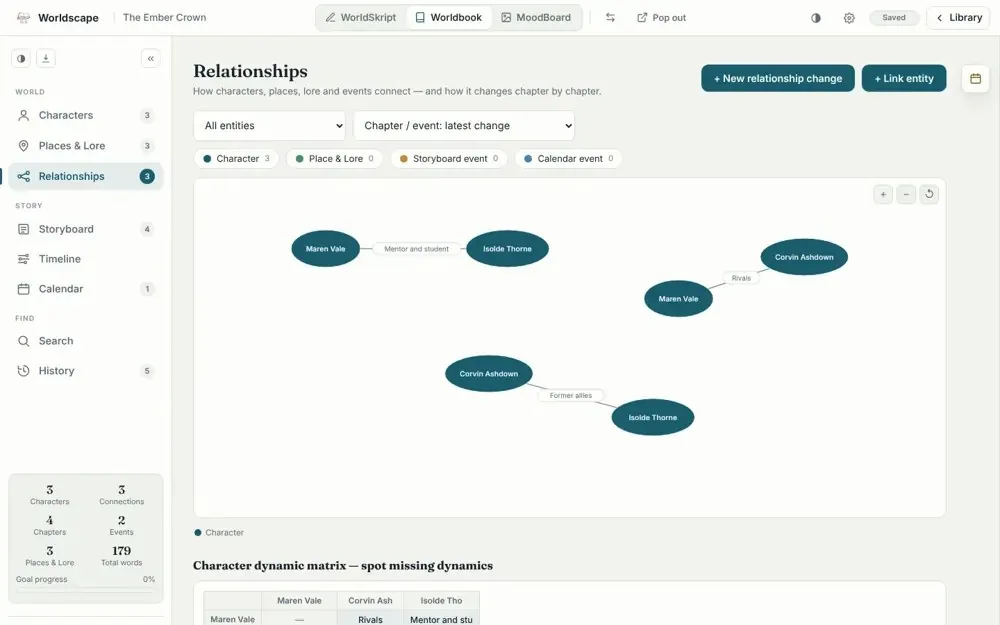
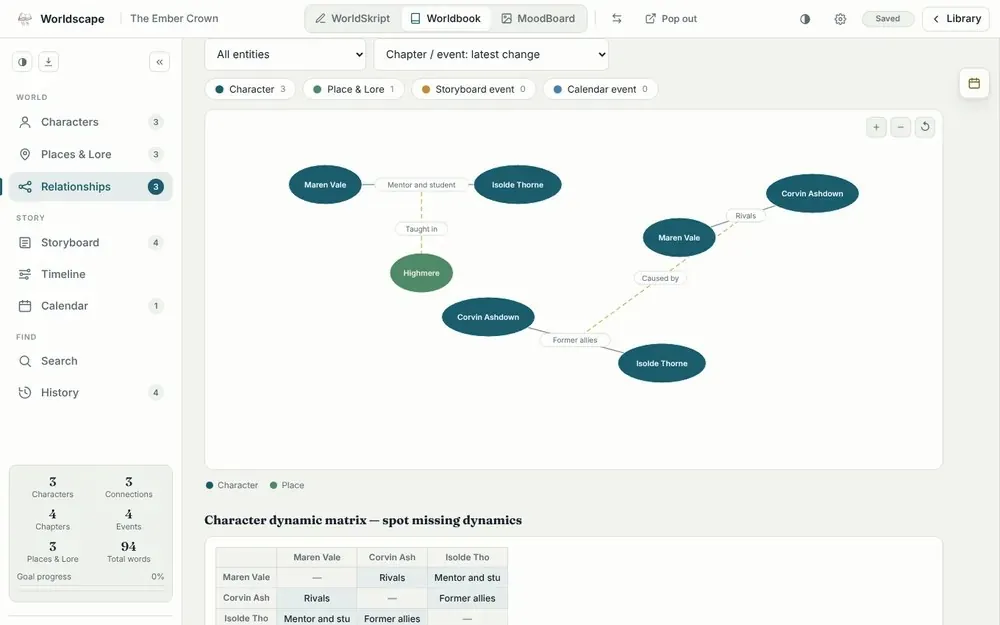
Record how characters, places, lore, chapters and events relate, and how those relationships change over the story. The graph shows connections, and you can filter by entity or chapter.
Link relationships
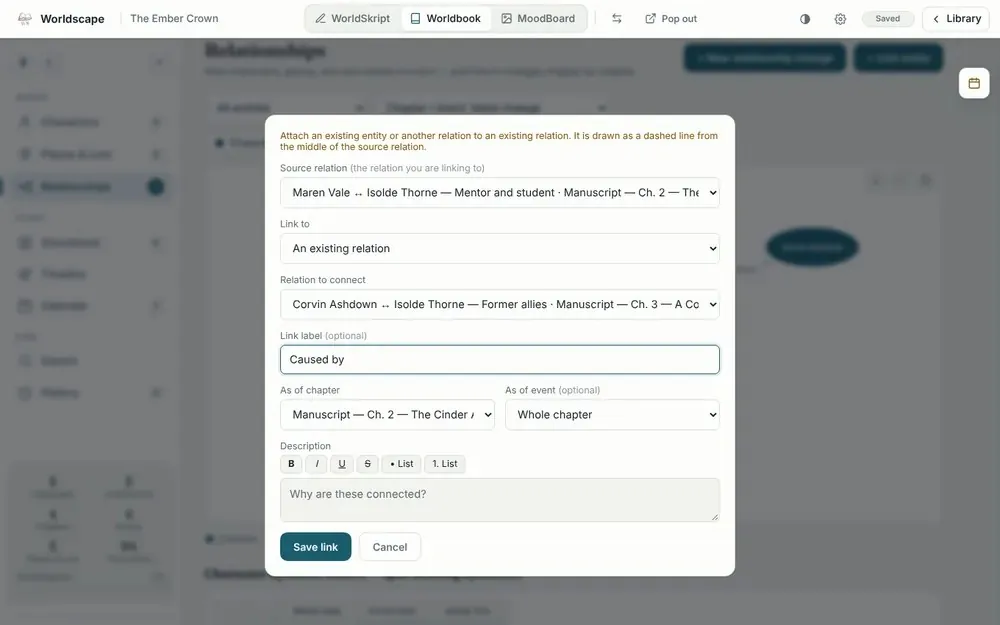
Besides a relationship between two entities, you can link a relationship to another relationship, or a relationship to an entity (a place, an event, a calendar event).
- Select + Link entity.
- Choose the Source relation, the one you are linking from.
- Under Link to, choose An existing relation or An existing entity and pick it.
- Add an optional label (for example Caused by) and the chapter it applies to, then select Save link.
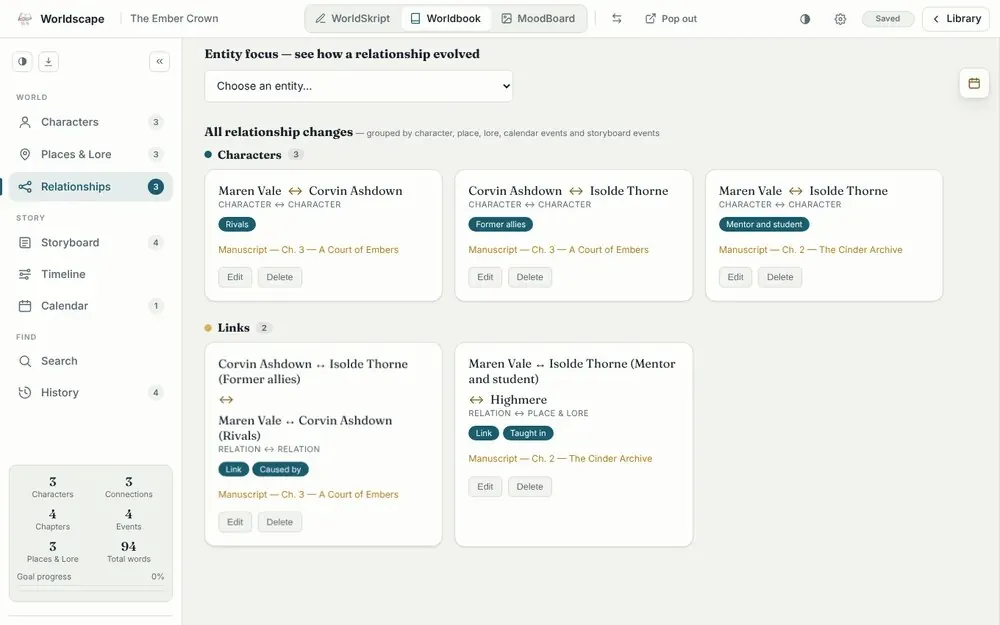
A link is drawn as a dashed line from the middle of the source relation. Below the graph, all links are listed under Links, and they also show up as gold chips on that chapter in the Storyboard.
Storyboard
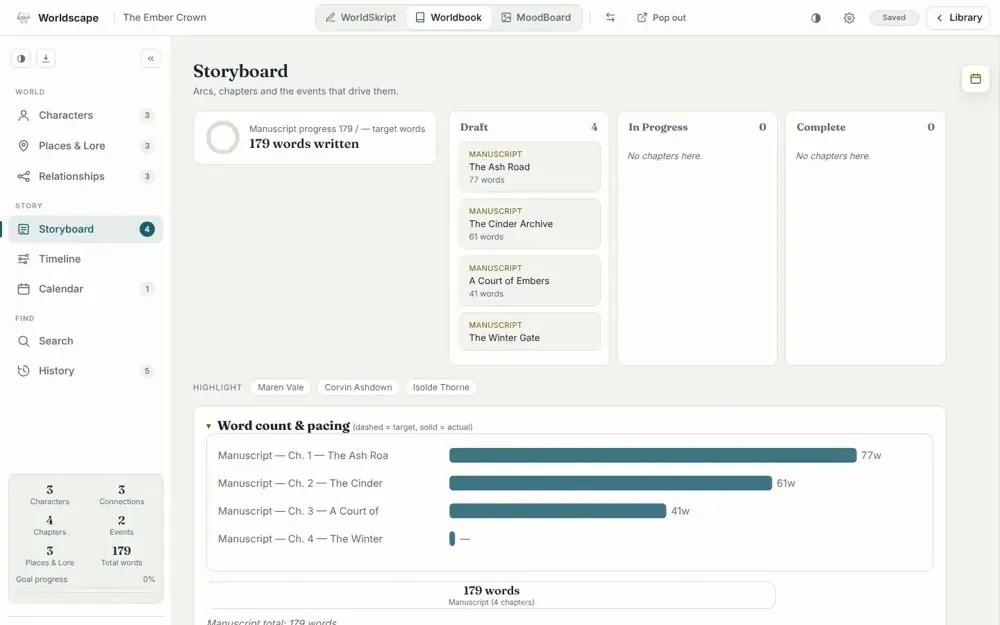
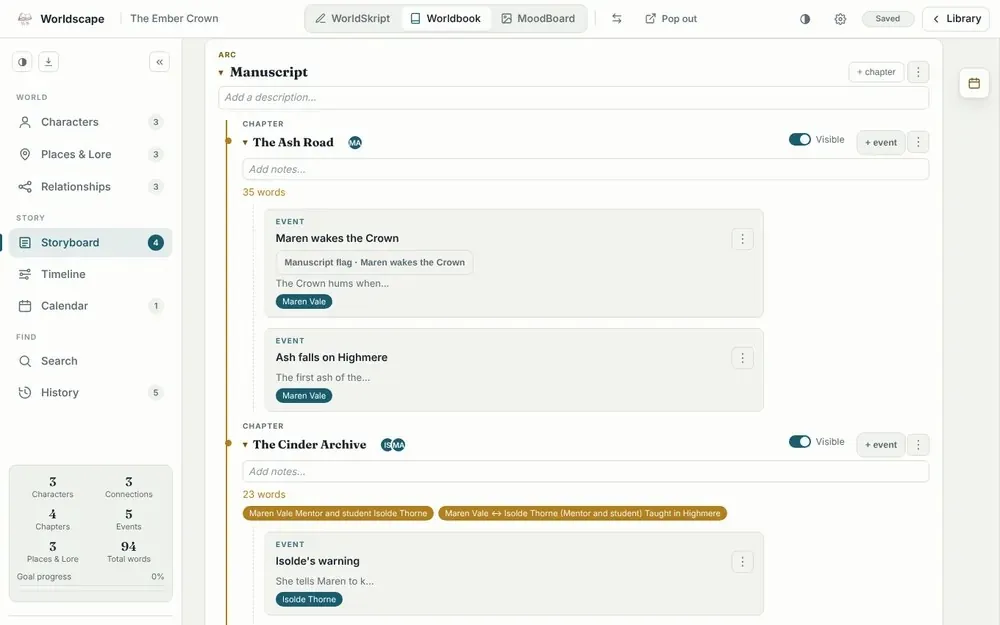
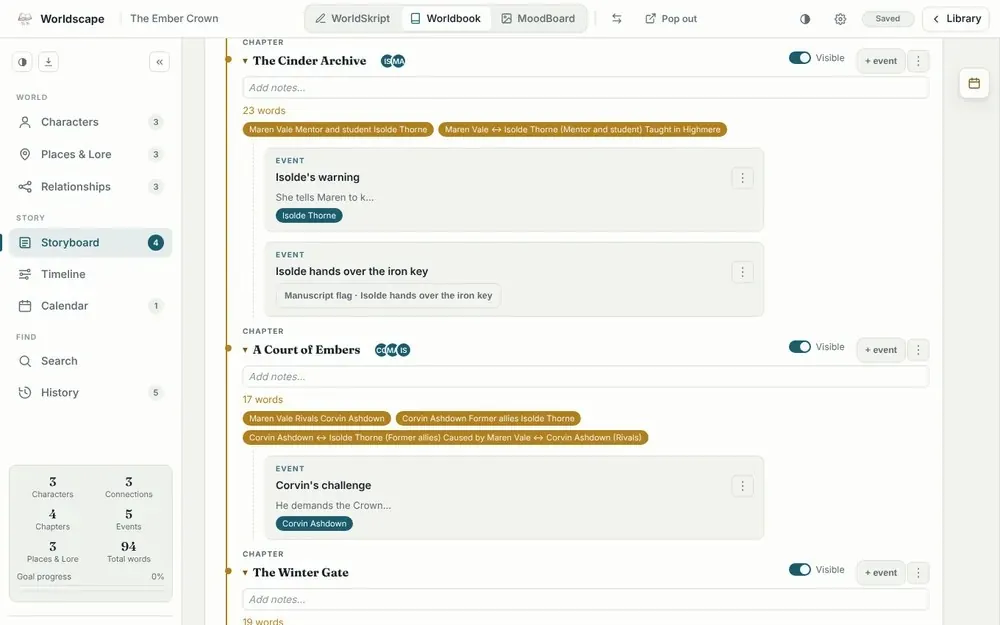
Arcs, chapters and events. Chapters created here appear in WorldSkript, and the other way round. Add events to a chapter here, and place them in the manuscript wherever you want. Scroll down past the progress board to the arcs. An arc holds its chapters, and each chapter holds its events:
- Chapters made in WorldSkript appear here by themselves, inside the Manuscript arc. The Visible switch shows whether the chapter is in the manuscript.
- Select + event on a chapter to open the event editor: title, order, description, characters, places and calendar date. Use the ⋮ menu on an event to open or delete it.
- Round initials next to a chapter title are the characters involved. Relationships and links for that chapter show as gold chips under its notes.
- An event that has a flag in the manuscript carries a Manuscript flag button, which opens WorldSkript at that spot.
See “Events: send and add in both directions” in section 5 for how events move between the two apps.
Timeline
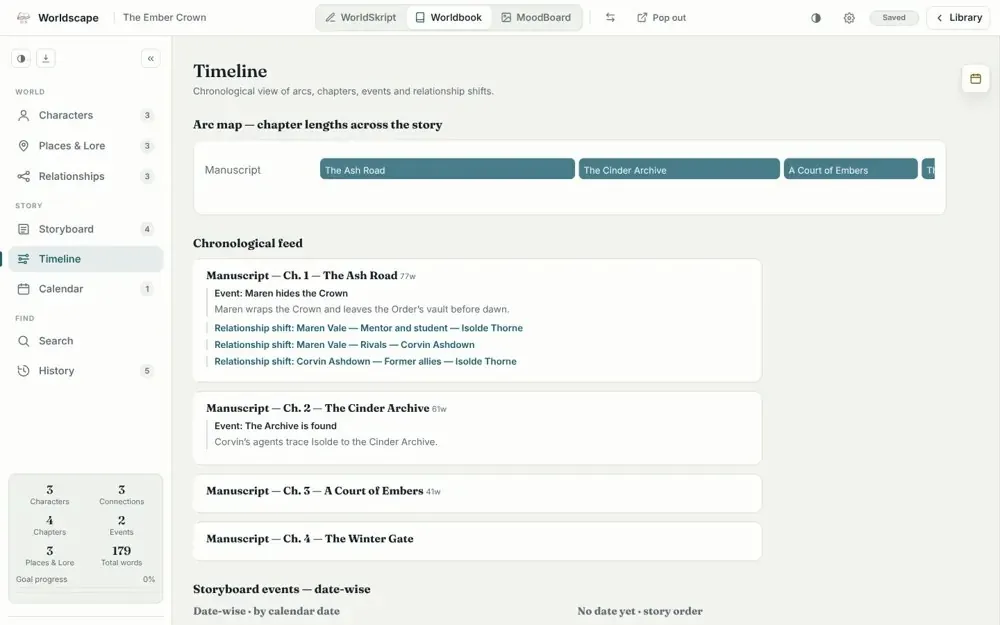
See your whole story at a glance: chapter lengths, events and relationship shifts, in order.
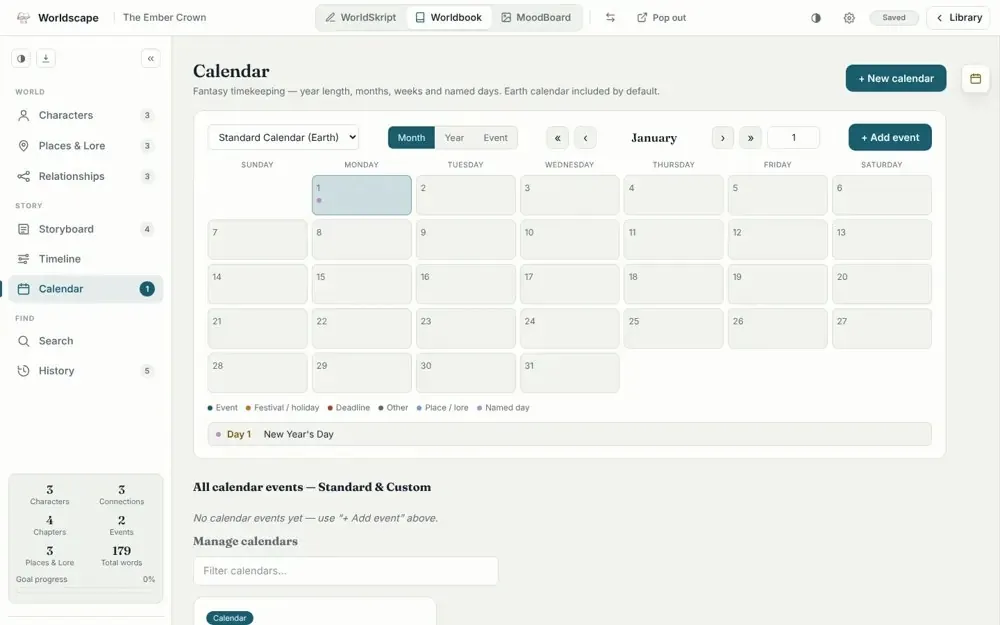
Calendar
Use the standard calendar or create your own fantasy calendar with custom months, weeks and named days.
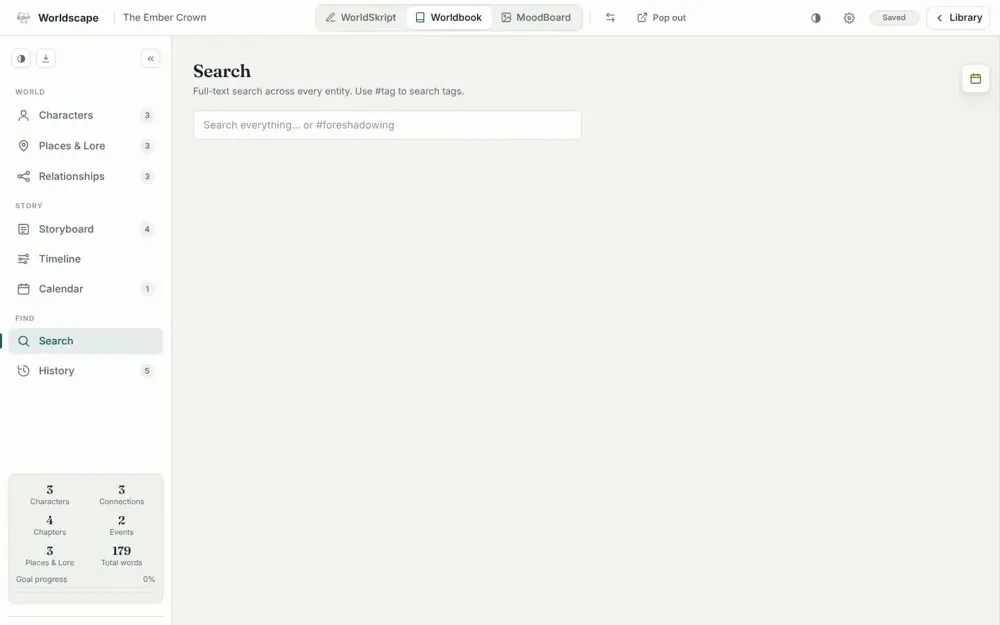
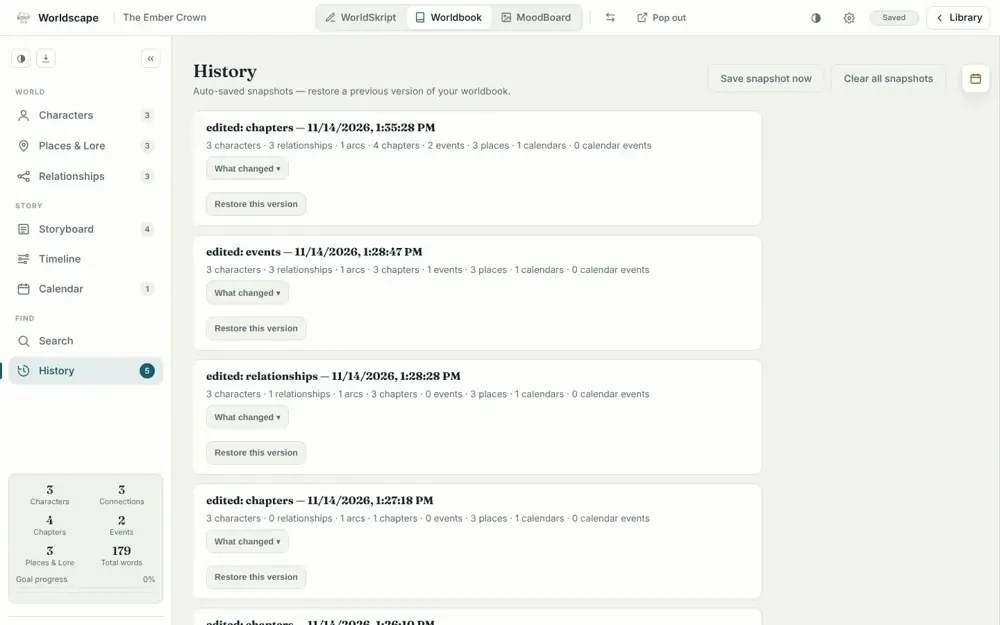
Search and History
Search finds anything in the world (use #tags). History keeps automatic snapshots of your world that you can restore.
MoodBoard
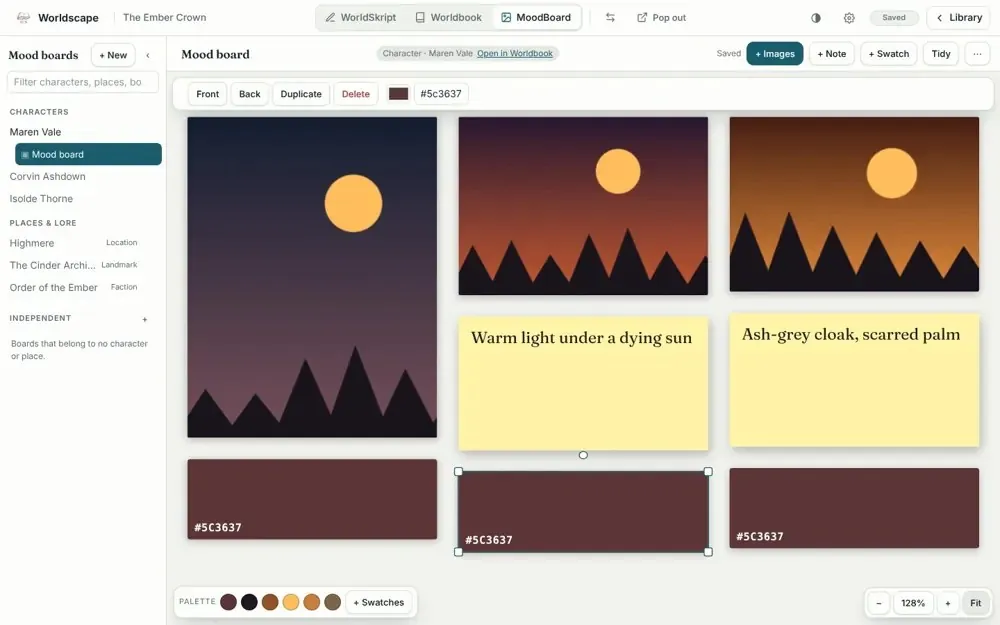
Boards of pictures, notes and colour swatches.
Each character, place or lore entry can have its own board. Add images, notes and colour swatches. A palette is built from your pictures, and Tidy arranges everything into a neat collage.
- Add pictures with + Images, by dropping files or by pasting.
- Boards can also be Independent, linked to nothing.
- Open in Worldbook jumps to the linked entry.
How the apps stay in sync
What is shared between the three apps.
- A chapter created in WorldSkript appears in the Worldbook storyboard, and the other way round.
- The Visible switch on a Worldbook chapter shows whether it is in the manuscript or set aside in the Scrapyard.
- Delete from manuscript in WorldSkript removes the text only. Complete deletion in Worldbook removes the chapter everywhere and cannot be undone.
- Characters and places from Worldbook feed the Artifacts panel and the MoodBoard sidebar.
- An event sent from WorldSkript (☰ → Events → Send to storyboard) appears in the Worldbook chapter. An event planned in Worldbook (+ event) can be placed in the text with Add at cursor. Both stay linked, so the Manuscript flag button always finds the spot.
- Extra pages and new chapters are added to the WorldSkript index by themselves.
Where your files live
The project folder and backups.
Everything is saved in your project folder, so you can back it up or sync it like any other folder:
<Project name>/
  worldscape.json    project settings and links
  manuscript/        your WorldSkript drafts
  world/             your Worldbook file
  moodboards/        your boards and pictures
Removing a book from the library only removes its card. Your files are never deleted.
Backups. Use Backup & restore in the WorldSkript … menu to save or load a copy of your work.
Shortcuts cheat sheet
Default keyboard shortcuts.
Every shortcut can be changed in Settings. Defaults:
| Action | Shortcut |
|---|---|
| Write / Plan / MoodBoard | Ctrl/⌘ 1 / 2 / 3 |
| Back to library | Ctrl/⌘ 0 |
| Save a version | Ctrl/⌘ S |
| Find / Replace | Ctrl/⌘ F / H |
| Add note | Ctrl/⌘ Alt N |
| Sticky notes panel | Ctrl/⌘ Alt M |
| Flag a major event | Ctrl/⌘ Alt E |
| Cite a source | Ctrl/⌘ Alt R |
| Scene break | Ctrl/⌘ Enter |
| New page | Ctrl/⌘ Alt Enter |
| Paragraph styles | Ctrl/⌘ Alt 0–3 |
Happy writing.
Ready to try it? Download Worldscape and follow along with your own project.
Download Worldscape